CLICK HERE FOR FREE BLOGGER TEMPLATES, LINK BUTTONS AND MORE! »
Showing posts with label blog hop. Show all posts

Saturday, August 13, 2011

The Beginning of School Blog Hop Day #2


Hi Everybody!  It's Day #2 of a wonderful school-related blog hop!  If you just came from the very creative Michelle's blog @ http://peanutbutterandjellydes​igns.blogspot.com/ then you are in the right spot!   If you just stumbled into this Blog Hop, then by all means join us!  This is a great hop featuring Back to School Crafts! Please head over to see Kathryn at http://www.creationswithkathry​n.com/to start from the very beginning.  Be sure to read to the very end to have a chance at blog candy!


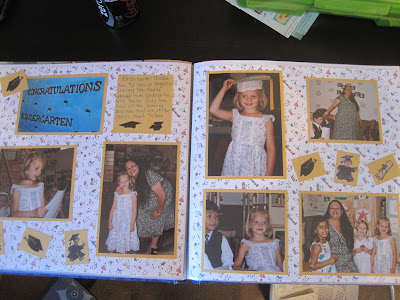
"Congratulations Kindergarten!"  2009
This is another 12x12 two page layout featuring my daughter's last days in Kindergarten.  Sorry for the grainy photo, the lighting is funny here!


Left Hand Side
The background paper is Creative Imagination's Baby Alphabet.  I loved how the alphabet theme reinforced the feeling of Kindergarten.  The title, Congratulations Kindergarten is actually a photo taken on a bulletin board in the hallway!  I thought it was cute and it works great for a title.  I matted all my photos in sunflower yellow and then created little matting squares for various stickers that reinforced the graduation theme.  

The Suzy Zoo Graduation stickers are really cute, but would have gotten lost on the busy background paper if they hadn't have been matted!

The Right Hand Side
I continued the graduation theme with more stickers!  Great use for the end of sticker sheets!  I used Grossman's Sticker's by the Yard, Suzy Zoo Graduation stickers, Frances "Ultimate Grad" stickers and Stickopotamus "Graduation."  Even though the stickers came from four different makers, they work really well together!

Blog candy:

There are several ways to get an entry!
1.  Comment on today's post = 1 entry
2.  Comment on yesterday's post = 1 entry
3.  Become a follower (or already are one) = 1 entry
4.  Mention my blog on your blog (give me the address of yours to see!) = 1 entry!
**Just be sure to leave your contact information for me!**

I will use the Random Number Generator on Monday, August 15th to find a winner!  Winners must be within the US and respond to my email within 5 days to claim the prize


Thank you, now please head over to see Nicholette's amazing project @ http://www.beyondscrapin.blogs​pot.com/


Friday, August 12, 2011

The Beginning of School Blog Hop Day #1


Hi Everybody!
If you just came from the very creative Michelle's blog @ http://peanutbutterandjellydes​igns.blogspot.com/ then you are in the right spot!   If you just stumbled into this Blog Hop, then by all means join us!  This is a great hop featuring Back to School Crafts! Please head over to see Kathryn at http://www.creationswithkathry​n.com/to start from the very beginning.  Be sure to read to the very end to have a chance at blog candy!


"Kindergarten" 2009
This is a 12x12 two page layout featuring two different background papers.  I usually use matching background papers, but this last week I decided to use up some papers I had laying around and decided I wasn't breaking any scrapbooking "rules" if I used two different papers!

Left Hand Side
The background paper is unknown but it features a cute chalkboard scene.  I cut "Kindergarten" from Locker Talk (Love that cart!) on some fun crayon swirl paper (also unknown maker).  Then I matted a 5x7 photo of my daughter on yellow school lined paper (hard to see in the photos, but matches journaling block).  The yellow school lined paper is from The Hittin' the Books Stack from DCWV.

 Right Hand Side
The background paper is a coordinating yellow pencil paper with cute apples (also unknown maker!).  The photos on this page are matted in the same red swirl crayon paper as the title is cut from and then I ran a 2 inch stripe behind the lower photos.  I wrote the journaling on the yellow school lined paper in red ink and then matted all of that!  

Note:  I think all the unknown paper is from the Dollar Tree in a school pack; however I am unsure!

Blog candy:

There are several ways to get an entry!
1.  Comment on today's post = 1 entry
2.  Comment on tomorrow's post = 1 entry
2.  Become a follower (or already are one) = 1 entry
3.  Mention my blog on your blog (give me the address of yours to see!) = 1 entry!
**Just be sure to leave your contact information for me!**

I will use the Random Number Generator on Monday, August 15th to find a winner!  Winners must be within the US and respond to my email within 5 days to claim the prize


Thank you, now please head over to see Nicholette's amazing project @ http://www.beyondscrapin.blogs​pot.com/


Sunday, July 31, 2011

Birthday Blog Hop Day #2

Welcome back to Day #2 of the Birthday Blog Hop!
If you have just hopped on the tour, please go to the first stop on the hop at Samantha's Cricut Creations (www.samanthascricutcreations.blogspot.com). If you have arrived from http://gloriasgoofycraftspot.blogspot.com/ then you are in the right place. Thanks for hopping by! 

My daughter's birthday is coming up and she loves horses!  In fact, we're taking a couple of girls horseback riding for her party, so these are the invitations I created.  I used cloud patterned paper for the background (it's one sided so the inside is white!) and then cut the horse (three layers) from My World.  I cut "Howdy" from Create a Critter, along with the grass.  I welded the taller end grass to the shorter middle grasses and created a little grassy field for him.  Lastly, I took a Versa Watermark pen, and added details to the horse and grass!

Hope you like it and I love comments and new followers!

Next, head to:

Saturday, July 30, 2011

100th Post and Birthday Blog Hop Day #1

It's my 100th post!  Wahoo! 

Now, onto business...
The Birthday Blog Hop Day #1
If you have just hopped on the tour, please go to the first stop on the hop at Samantha's Cricut Creations (www.samanthascricutcreations.blogspot.com). If you have arrived from  http://gloriasgoofycraftspot.blogspot.com/ then you are in the right place. Thanks for hopping by!


My Dad's birthday is Monday, August 1st, so I made this special shape card for him!
My parents "full-time" in a motor home and travel all over the country visiting any place they want!  It's quite the life!  So, I though he definitely needed an RV shape card.  Luckily I have the Camping cart, and had one readily available.  I cut the shadow (black), the body (cream) and then the shell (tan).  While I thought this looked good, it needed something else.  I hand cut the windows and headlights to added a little pop of color.  I also added two small mat silver brads for rear tires and one larger one for the front tire.  Lastly, I cut the star from Home Decor (twice) and added it to the back.  I thought the RV needed a little "birthday" pop!


 Thanks for looking and I love comments and new followers!  Be sure to come back tomorrow for another great birthday card!  


Now, head to Courtney at  www.craftingwithcourtney.blogspot.com!  She is so creative!  You will love her project!


Here's the blog list in case you get lost! ;)  

Samantha
http://samanthascricutcreations.blogspot.com/
Meighen
http://scrappin3rdeeschik.blogspot.com/
Jenn
Ruthie
http://septemberninth.blogspot.com/
Gloria
Jen
http://mccalleyhouse.blogspot.com
Courtney
Momo
http://madebymomo.blogspot.com/
Kim
http://rickettscricuts.blogspot.com/


Thursday, June 30, 2011

All American Blog Hop! (With Blog Candy!!!!!)


Hi Everybody!
If you just came from the very creative Paula's blog @ http://www.owlbescrappin.com then you are in the right spot!   If you just stumbled into this Blog Hop, then by all means join us!  This is a great hop featuring All American Crafts. Please head over to see Jenny at http://www.crazyaboutcricut.blogspot.com to start from the very beginning.  Be sure to read to the very end to have 2 chances at blog candy!


Thank you for joining us for the All American Blog hop!  We are sharing projects that celebrate anything American!  So anything like BBQ's, family picnics, 4th of July, or more.  I created a 4th of July layout using pictures from 2009.  (Yes, I'm still behind in my scrapping!) 


Sorry for the bad picture!  It's raining outside and unless I wanted the flash reflection, this is the best I could get today!  I made a two page 12x12 layout for the Fourth of July.  I based it all on textured cream cardstock and used a deep red to mat all the photos.
Here are photos of each page separately.
Left page...

Right page...

I then used EK Success Fresh Cuts FC014 Free & Brave.  This is a page of cardstock accents that you hand cut out (yuck!)  and then can use.  I love that they are pre-done, but sometimes I feel like spicing them up.  That's what I did today.  Although the cardstock accents are 2-d, they have buttons, brads and fibers printed on them.  Today I added whatever accent they had printed myself, creating 3-d embellishments.  This is a combination of three accents that I set together to make the title.  I popped the title up with foam tape and adhered buttons with fibers to everywhere that they were printed.  Using glue dots helped make the buttons stick!

Another accents featured cute white stars.  Luckily I had these brads in my stash and they looked great, so I added them to the hat!

Another accent were these cute photo corners (all 2-d) with printed fiber knots on each one.  I tied my own little red fiber knows and stuck them over the printed ones.  This is the only photo I didn't mat, but with the photo corners, it stands out on its own.

This heart accent was cute, but with a little spicing up, it is adorable!  I added the white button over the printed white button and then hand sewed the red fibers where it was printed.  This was a pain because I couldn't find my needle so I had to hand sew the heart and all the little ties in the buttons.  What one will do for creativity, right?

This is one of my favorite accents.  It was a 2-d flag with buttons printed where the stars should be.  I layered blue buttons with khaki fiber knots over the top. I actually threaded three buttons per fiber and made a string of them so it would be flatter.  (I tied a knot, then threaded one button, then a second and then a third and then tied the last knot.  This made little rows of three buttons!)

Blog candy chance #1 Scrapping at the McCalley House:

There are several ways to get an entry!
1.  Comment on today's post = 1 entry
2.  Become a follower (or already are one) = 1 entry
3.  Mention my blog on your blog (give me the address of yours to see!) = 1 entry!
**Just be sure to leave your contact information for me!**

I will use the Random Number Generator on Sunday, July 11th to find a winner!  Winners must be within the US and respond to my email within 5 days to claim the prize.

Blog candy chance #2 From CrazyaboutCricut 
There are a couple of GREAT prizes to win today!  You can win a Scrap 'n Tote!!  You can also enter to win this AWESOME prize pack from Post-it! There is also the BBQ set of stamps from Peachy Keen!

To enter to win the prizes:
1. You must leave a comment on all of the blogs in the hop.
2. Please be a follower of Crazy About Cricut.
That's it!  Winners will be announced July 7th!  

Thank you, now please head over to see Sandra's amazing project at Sandra @ http://www.sweetpeascards.blogspot.com/

Here is the lineup in case you get lost or need to stop along the way:
Heather @

Tuesday, June 28, 2011

Coming Soon: All American Blog Hop! (With Blog Candy!!!!!)


Be sure to stop by Thursday to check out this great All-American blog hop featuring all type of scrapping crafts!  There are many talented ladies who have great projects ready to show!

Saturday, April 2, 2011

April Showers Bring May Flowers Blog Hop Day #2


Day #2
And a New Project!!!!

You should have arrived from Melissa's page at http://disneydreamerdesigns.blogspot.com/
If not, please go back to the beginning at Kathryn's page http://wamfamily.blogspot.com/ and enjoy all the great projects!

Yesterday, I covered the rainy (or rainboot) part of April Showers Bring May Flowers, so today I'll cover the May Flowers portion!

Be sure to read to the bottom for information about Blog Candy!


 "Garden"
I am sure you have all done this; purchased a pretty paper that had a HUGE pattern to it and then struggled with a way to use it.  Well, I Think this is Debbie Mum paper and I really like it, but the bottom pattern is about 3 inches tall!  I always look at this paper and then pass it up because it won't hold all my photos or it just isn't right.  Well, I sat down and decided I was going to use it!  :)  Everything you see on the background paper (along the bottom and the border all the way around) is part of the patterned paper.  I matted my photos in a solid dark green to help them stand out from the background.

I'm in a "use it up" phase, so I found this garden title in my stash.  It was one of those tear out titles that CK Magazine use to put in their magazines.  I can't believe I still had it!  I chalked the title and then hand cut it all out.  (Pain in the rear, but it looks great!) I simply stuck it to the background paper!
My journaling block was cream paper (to match the background) matted on the same dark green paper.  I wrote the journaling out with green Zig marker and then used a package of Jollee's stickers (garden theme) to make a little border across the bottom.  I also used two little flowers to give the upper corners an accent!  Quick and easy!


Now, for BLOG CANDY!

To qualify for blog candy:
1. become a follower (or show you already are!)
2. leave a comment on this project.
3. leave a way I can get in contact with you
4. If you visit both days, and leave 2 comments, you will double your chances of winning!

I will choose a Blog Candy winner on Monday, April 4th.

Next Stop:
Lisa's page at http://www.cricutingwithlisa.blogspot.com/


Friday, April 1, 2011

April Showers Bring May Flowers Blog Hop Day #1

Day #1

Since we live in Oregon, we have plenty of opportunity to showcase the "showers" portion of this blog hop!  Funny thing though, often I don't have pictures because who wants to get their camera wet???  I have to remedy this!  For goodness sake, we live in Oregon!  On to today's blog hop! 

You should have arrived from Melissa's page at http://disneydreamerdesigns.blogspot.com/ not, and you happened to stumble across this blog hop, please go back to the beginning at Kathryn's page please go back to the beginning at Kathryn's page http://wamfamily.blogspot.com/ Ifand enjoy all the great projects.  We have a very talented group of ladies!
Be sure to read to the bottom for a chance at blog candy!


 "Rainboots 'n String Cheese"
This is a layout of some older pictures of my son and my dad.  (Austin is almost 10 now!)  I wanted to be able to showcase the special relationship that they have, plus all of the funny things that Austin did at this age! 
The background is a blue patterned paper from an old paper pack.  The matting is done with paper from the same pack, just the reverse coloring (blue background and white pattern).   I had several packages of blue and yellow letter stickers, but none of them had enough for the titles, so I mix and matched them.  (I think it looks really playful and used up a bunch of old letter stickers!)
The title was all from the same pack of blue letter stickers and then I used a Jollee's umbrella to accent the title.  I added a little crystal bling to the top of the umbrella for a little eye candy.

Then I used the rainboots from the same package and made a "matched" set on the bottom edge.  I found these raindrop crystals (with popdots attached) at the CK convention in Portland one year.  I have no idea who made them, but they really add to the page, don't you think?

I had made this "A" accent at a make and take (at the CK convention too!) and I found the colors worked perfect!  It was really easy to make!  A die cut yellow oval with a smaller die cut blue patterned paper oval layered over the top.  The letter A cut from an alphabet paper and adhered with pop dots.  A safety pin at the top gives it a great "tag" feel.

Lastly, and probably the thing that ties this whole page together, the tags!  I measured the amount of space that I could write on each tag (don't count the hole spot!) and then I made a text box that size in word.  I made one text box per tag and made sure there was lots of space between them.   I typed in my journaling and then printed it on regular white paper.  I then took blank white tags and used my repositionable adhesive and adhered them OVER the journaling that was on the printer paper.  (Now I know where to put the tags and what direction to have them facing!)  I then hit print and held my breath!  It worked! :)  I am so excited!  I then took blue chalk and chalked the edges so they stand out a bit.

Now, for BLOG CANDY!


To qualify for blog candy:

1. become a follower (or already be a follower!)
2. leave a comment on this project
3. leave a way I can get in contact with you
4. If you visit both days, and leave 2 comments, you will double your chances of winning!

I will choose a Blog Candy winner on Monday, April 4, 2011.

Next Stop:


Saturday, March 5, 2011

It's All About the Green Blog Hop Day #2

It's All About the Green Blog Hop
Day #2
And a New Project!!!!
You should have arrived from Melissa's page at http://disneydreamerdesigns.blogspot.com/
If not, please go back to the beginning at Kathryn's page http://wamfamily.blogspot.com/ and enjoy all the great projects!

I am such a lucky person because of all the great things I have in my life, and I wanted a scrapbooking page to showcase that.  This was a new type of layout since I normally scrapbook events, but I really enjoyed creating it.  The hardest part was choosing what "Lucky" things to feature!

Sorry for the bad lighting, but it's pouring down rain outside and I just couldn't get a great picture without a flash!  This is a 2 page, 12x12 layout.  The all the papers except for the title are from The Green Tea Stack from DCWV.  It had 48 coordinating sheets of paper, which I love to work with! 
I cut the title in two parts.  First "Lucky" was cut from the Create a Critter cartridge.  But, I really wanted the title to read "So Lucky", but I couldn't find a great "so."  Time to improvise!  I cut the "So Cute" from Create a Critter as well, being sure to cut it the same size as the Lucky.  I made sure they were the same ratio by layering the U from cute over the U in lucky and changing the size on my Gypsy until they aligned.  I then separated the two titles and had the Cricut cut both.  (I tried hiding portions of So Cute, but I couldn't hide letters...)  I then took scissors and cut the C, T, E portion of CUTE off and layered the So and the U (from cute) over the U in lucky!  Now my title says, "So Lucky" and you can't even tell I pieced it together!  I matted the whole title on brown from the same paper stack.

I cut out several clovers from Indie Art and wrote other things that show how lucky I am!  I added a lighter green large mat (for a 4x6 photo) and wrote in brown along the bottom "to be married to Matt."  I adhered a couple pieces of green glass squares to the bottom with glue dots for a little more bling.  (The 2 clovers say "for my health" and "to be a teacher.  It is my passion!")

The second page continues the same page.  I added another green mat and then a brown mat for 2, 4x6 photos.  I wrote along the bottom of the green mat "to have a house I love" and added several shades of green glass again.  The brown mat says "for Austin and Maddie," my kids.  I used Green Magic mesh and ran it from the right side of the right page to the brown photo mat.  I layered a larger brown clover over the top and then stuck a smaller green clover to the top.  Where the green mesh overlaps the brown mat, I used more glue dots and stuck on some more green glass and then a sparkly cut glass circle.  The two clovers say "for my 2 dogs" and "to be alive, in love and happy!"


Now, for BLOG CANDY!
To qualify for blog candy:
1. become a follower (or show you already are!)
2. leave a comment on this project and tell me why you are so lucky!
3. leave a way I can get in contact with you
4. If you visit both days, and leave 2 comments, you will double your chances of winning!
I will choose a Blog Candy winner on Monday, March 7th.

May the luck of the Irish be with you!

 
Next Stop:
Lisa's page at http://www.cricutingwithlisa.blogspot.com/