I know, who isn't, right? But since getting the Cricut Expression, I am loving its versatility! I actually might be getting more scrapbooking done, but I am also
saving money! I make my own cards and now I'm branching out into Halloween decorations! Below are a few things I've been working on over the last few weeks.
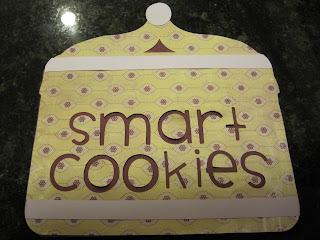
I am a first grade teacher and I teach the intensive reading group at school. The intensive reading group is comprised of children the furthest behind in reading; because of this, behavior can sometimes become a problem. They loved it when I called them "Smart Cookies" and I kept referring to this imaginary cookie jar. Well, one day while teaching I thought of the idea of making a "Smart Cookies" Cookie Jar and then making paper cookies to fill it with. When the cookies are all in the jar, then the reading group will earn a "cookie party!"
I love how this turned out! I didn't have any of the cartridges with a jar, so I used George to make a rounded corner rectangle and then I welded one parenthesis from Gypsy Wanderings (I think). They come in a set, so I hid the other one and then rotated it to make it look like a lid! I cut two cookie jars, one in patterned paper with the words Smart Cookies cut out and then one in maroon that is just the outline. I used George again to make the stripes across the jar and the knob at the top for added decoration. I pieced it altogether and then decided it would be too flimsy as is, so then I adhered it to a piece of cardboard from an empty cereal box. Now it doesn't flop and curl and it's a lot sturdier!


Well, you can't have a "Smart Cookie" Cookie Jar without cookies, right? I used George again and make 1.75 inch (or so) circles. I used the triangle feature and overlayed the triangles and then rotated them in different directions so it looked like chocolate chips. I cut these out in cream paper. I then cut the same circle size out of brown paper and layered it behind. I though layering a circle was easier than gluing 4 chocolate chips per cookie! I then cut as many as I could on a 12x12 paper and I ended up with 49 cookies! I then inked the edges with dark brown to make them look more realistic! Once again, George was the best investment!
Bosses Day October 16th, 2010
AAAKKK! Bosses Day falls on a Saturday this year and I totally missed it on Friday. My Principal is fabulous and he loves a strong cup of coffee. He even hosts "A Cup of Joe with Joe" parent meetings, so coffee is his thing! I used Gypsy Wanderings and cut out large coffee mugs and then Sweet Treats font for the phrase "Thanks a Latte Mr. Galati!". I inked all the edges with chestnut brown for some definition from the white poster board. Normally I would have decorated his door with this, but he gets to work about the same time I do, so I put it all on 2 pieces of poster board so I can literally slap them up and be done in case he's a little early!
"Too Cute To Spook"
Made by my 7 year old daughter!
We found glittery foam at the Dollar Tree and she just had to think of something to use it for. She was clicking through scrapbooking/card making blogs that I had left open on my computer and she found one she liked that featured a Penguin, fangs and the phrase "Too Cute to Spook." She found the cat on Paperdolls Everyday. We cut it at 4 inches and used the #5 on the blade and max pressure. We cut it twice and it was still not a clean cut, but we were able to see where to punch the cat out! She added a hand cut witches hat and a pink nose. The googly eyes and hand drawn mouth and whiskers truly make it too cute! She mounted it all on yellow paper and then adhered it to a piece of patterned paper with a Halloween design!
The easiest cards in the world! (Cricut not even needed, but shhh! Don't tell anyone!)
I cut double sided Halloween paper to 9 inches long by 4 inches wide. I folded it in half, and then folded down a 1 inch flap. I wrapped a piece of ribbon around the flap and adhered it and the flap down. I used a very thin piece of adhesive to glue the edges of the folded "envelope" on each side. I then cut a 3.5x4 inch square of patterned paper to slip inside the "envelope" and voila! a quick and adorable Halloween card!
This is what it looks like once the card is removed!
"Dare To Enter"
My son (9 years old) complained that all of our Halloween decorations were not scary enough, so I was digging through the Cricut stuff and found I don't have any Halloween carts. (I quickly ordered one and am still waiting, but that's another story!) I used George, once again, and welded two ovals together, overlapping them slightly at the bottom by rotating them. I cut these out of purple paper and fun foam. (Much easier to cut than the glittery foam!) I then welded two circles together for the "whites" of the eyes and cut them in yellow. Then I took a black marker and colored in the pupils and then used stickles over the top to make them sparkly. I love how they look! I cut the Dare to Enter out as well and hung the whole thing on our front door. Not knock down scary, but I love it!


.JPG)


