CLICK HERE FOR FREE BLOGGER TEMPLATES, LINK BUTTONS AND MORE! »
Showing posts with label George. Show all posts

Thursday, August 4, 2011

Thankful Thursday Design Team Post--Bookmark


My kids LOVE to read, so making a bookmark should be something I do all the time, but I haven't!  I was stuck for a while for ideas but then I remembered that my son applied for a position to the Green Team at his school and he got it!  I was so proud of him!  The Green Team is a team of students that helps keep the school green and eco-friendly.  I decided he needed a "green" bookmark!  Besides encouraging people to be green, I used only scraps from my scrap bin, so the bookmark is physically green too by using scraps! 
The bookmark was pretty simple!  I cut a rounded corner rectangle from George and Basic Shapes (LOVE THAT CART!).  I then used Give a Hoot to cut out the "Go Green" phrase and the frog!  

Here's a close up of the frog!  I cut all the layers, including the shadow!  I think he's really cute!  My son picked all the colors and the frog and phrase!  Don't you think he did a great job? He wanted googly eyes too, so we plopped them on as well and it sure adds some personality! Lastly, I added a few fibers to the top to make sure the bookmark stays in place!

Thanks for looking and I love comments!
We have an awesome prize this month, it's a Post-it prize pack!! Don't forget to head over to Crazy About Cricut at http://crazyaboutcricut.blogspot.com  and enter your family's project!

Wednesday, May 4, 2011

Little Boy Wall Hanging

While attending the CK Convention in Portland this year, I fell in love with Keller's Creations mini license plates. I have used the full sized ones for a wall hanging in our house, but as soon as I was the mini's I knew I needed a new project! I bought six of them and decided to use them to create a wall hanging for my nephew Landon's room.


I also puchased a package of cute blue and khaki patterned paper and matching buttons at Keller's Creations as well.  I used those as the jumping off point for the solid papers that came from my stash.  It was perfect because Landon's room is a nice shade of light blue!

I cut Landon's name out using Jubilee, creating a shadow and the overlay.  I inked the edges to make sure that it showed on similar colored paper.  Landon's room is decorated in robots, but I don't have a robot cartridge!  I used George (my favorite cart!) to create this cute robot.  I then slightly expanded the size of it to create a black shadow. I was inking the edges of the robot when I dropped my ink pad on the grey robot!  It was awful.  Luckily, I was able to ink over the entire robot to give it a "rusty look."  That was a quick save!  I added a few Keller's buttons with cream fiber tied through.   (Hint:  I used glue dots for the buttons and googly eyes so they wouldn't fall off!)  I inked the edges of everything in brown ink for a cohesive look!

I attached each license plate together with a blue shaded fibers.  I cut the duck from Create a Critter!  (My brother and I are HUGE Oregon Duck fans!)  A couple more googly eyes for character!  Each mini license plate has a few buttons on it to add continuity.

What little boy doesn't like milk?  I used this from Locker Talk and cut the first layer (the milk and carton) in white craft foam!!!  It made the milk look like it had real dimension.  I then popped up the center part of the red milk carton with pop dots and inked the edges of everything.  I used a White Milky Pen to write "Milk."

The dog is cut from the last few remnants of my brown fuzzy paper.  (I think it's from Every Day Paper Dolls.)  I used a brown pen to add the accents and then layered on a cute pink nose and googly eyes.  I inked the edges again!

The balloon was a simple cut, but I cut off the string that was attached and tied on a real cream fiber.  I then flocked the patterned orange paper with orange flock to add a little interest.

Lastly, I added a car from Every Day Paper Dolls.  I used black brads for the tires and added a details with black paper (pop dots behind the windows!) and a black pen for details.  Lastly, I added a cute fabric tag with a curly q on it to mimic the "exhaust."

Hope you enjoy!

Sunday, May 1, 2011

Spy Party Invitation

April is the busiest month of the year for us!  We have three birthdays in the span 6 days!  My nephew is April 18, mine is April 20 and my son's is April 23!  To add to the chaos, Easter was on the 24th!  We also have both sets of parents in town for the big events!  None the less, it is now the beginning of April and I am able to blog some of the projects I did for the "big events!" 

Austin is all about spies and wanted his kid birthday party to center around his love for mystery and disguise. We decided to do the party at our house, so we started planning.  I made these invitations for Austin to hand out.

Using the Cricut, I created the file folder using George and Basic Shapes.  I cut it out on cream paper and then inked the edges in brown for an aged look. I wrote "Top Secret" on the file tab.  I then used Indie Art and cut the bomb out of red paper and the shadow out of black.  I used a watermark pen and added the small red highlight on the left side of the bomb. I then added Diamond glaze to the explosion part of the bomb for some shine and dimension.  I had to create the magnifying glass using George again, combining a rounded corner rectangle and two circles! Lastly, I had my son apply his thumb print underneath the magnifying glass for the finishing touch!

Inside, I adhered the note that set the stage for the party inviting all the kids to come be trained as secret service agents.    The boys loved the invitations and it really helped the theme come alive!

Friday, March 4, 2011

It's All About the Green Blog Hop Day #1

It's All About the Green Blog Hop
Day #1

You should have arrived from Melissa's page at http://disneydreamerdesigns.blogspot.com/  If not, please go back to the beginning at Kathryn's page  http://wamfamily.blogspot.com/ and enjoy all the great projects!

I knew with St. Patrick's Day approaching that I wanted to a make a St. Patrick's Day decoration for my house, especially since I'm partially Irish! :)  After searching through my Cricut cartridges, I realized I really didn't have any St. Patrick's Day items on my cartridges, so I had to make due.  In the end this project turned out really cute, and it's one of my favorite things I've created! 
Be sure to read to the bottom for a chance to win blog candy!
Everything seen here was cut by the Cricut! :)  I love my gypsy for this type of project!
First, since I didn't have any cartridges that had a four leaf clover, I used George and Basic shapes to layer 4 hearts, a rectangle and a circle (for the base of the stem) to create a four leaf clover.  I rotated the hearts and lined everything up to make it look like I wanted.  I cut it first in dark green.
Then I raided my recycling and I used a granola bar box to make some thin chipboard.  I wanted to have a stronger backing for the 4 leaf clover.  I broke open the box, removed any sticky areas and then made sure I stuck it to my mat really well.  I then changed the blade depth to 6, and put pressure on maximum.  I cut the 4 leaf clover again.  I then mounted the green cardstock clover to the cardboard clover to make it stiffer and stronger.

Next, I cut a banner from the Christmas Cartridge.  I stretched it larger than 12 inches and cut it once in the same dark green.  Then I scooted the banner to each edge of the mat so only the bows showed (There wasn't a layer for the bows alone.)  and then I cut the bows in light green.   

 I had hand cut the edges connecting to the banner to make the bows stand alone.  I used a green gel pen to add detail lines.  I then cut "A Wee Bit Irish" in white with the same light green as a shadow.  I used the Simply Sweet font.  I also found a 3 leaf clover on Indie Art.  I cut it out in a matching pattern paper and inked the edges green.

Next, I made a leprechaun using bits and pieces from Every Day paper dolls.  Paper Doll Dress Up has a leprechaun, but of course, I don't have that cartridge.  First, I cut about a 6 inch body out of tan paper.  I then used the baseball players shirt and pants to cut the light green shirt and the striped pants. 
 I then cut the fisherman's vest and hat in dark green.  I unlocked the ratio lock on the hat and stretched it taller so it would look more like a top hat.  I hand cut the light green stripe across the hat and used the same Indie art 3 leaf clover for an accent.  On the vest I added 2 large orange brads at the pockets.  I popped the 3 leaf clover and the vest up with popdots for added dimension.  I used George and Basic Shapes to make the buckles for the hat and his boots.  I cut 3 rounded corner squares with the center removed.  I had gold seed beads, so I applied Zig pen glue and stick the seed beads to it.  (The are really cute in person!)  I cut the hair and bow tie in orange and adding orange ink to the edges and gel pen accents.  Lastly, I added two googly eyes and drew the smile on in black Zig marker.  Lastly, I stuck my finger in a red ink pad and used it to make cute little cheeks.  I love him!

Next, I used copper wire to attach the 4 leaf clover to the banner.  I was sure to punch the holes through the cardboard as well.  (I even added some small cardboard squares to the back of the banner to reinforce it as well!)  I also added copper wire to the top to make a hanger.

Here it is hanging on my front door!

Now, for BLOG CANDY! 
To qualify for blog candy:
1.  become a follower
2.  leave a comment on this project
3.  leave a way I can get in contact with you
4.  If you visit both days, and leave 2 comments, you will double your chances of winning!
I will choose a Blog Candy winner on Monday, March 7th.  

May the luck of the Irish be with you! 

Next Stop: 


Saturday, February 5, 2011

Soccer Trading Cards in iPod boxes

Hello all and welcome to the Sports Blog Hop!
I am so glad you are here!  Now you should have arrived here from  Nicolette Simpson - Beyond Scrapin.  If you just came by chance head over to Creations with Kathryn and read through all the exciting blog candy and start at the beginning of the hop.     Below is my project!  Be sure to read to the end and find out about the BLOG CANDY I am giving away!

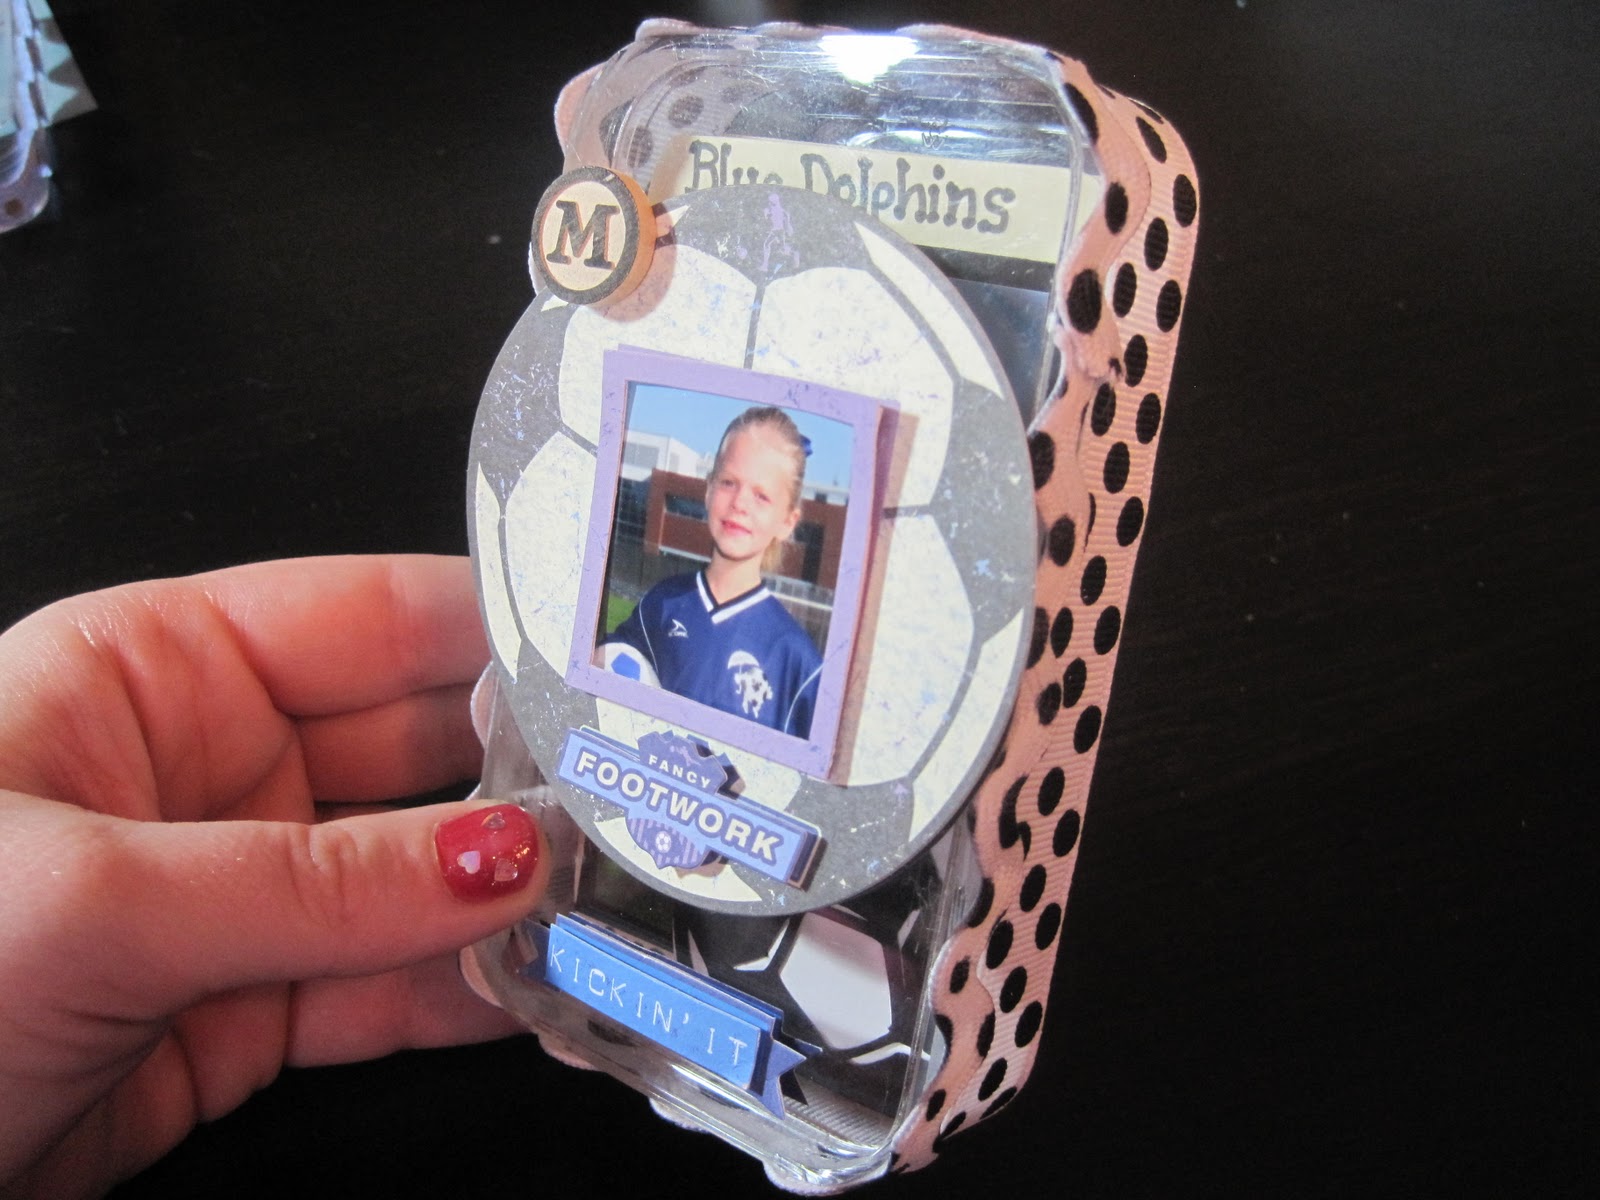
So, our challenge today was design something sports related.  Doesn't sound so tough, right?  Both of my children play soccer, so I have soccer pictures coming out of my ears!  I also have soccer layout after soccer layout as well, and after a while they start to run together.  (Both kids have played since they were 4 years old!  That is a combined 9 years of soccer pictures!) To combat my problem, I decided to create Soccer Trading Cards which fit in iPod boxes.  (You can use any container you want, just alter the size of your trading cards).

First, I measured the plastic boxes and then used George and Basic shapes to create rounded corner "cards" that would fit in the boxes.  (Exact measurements were 4.83 x 2.46 in.)  I was able to get eight cards per piece of paper.  I cut one sheet (12x12) of khaki and one sheet of bright blue.  I figure each season I will change the trading card color so it will be easy to figure out what pictures are from what season.  (i.e. 2007 is khaki, 2008 in yellow...)

After cutting out the cards, I began to scrap each trading card separately. Because of their small size and the desire to keep them fairly flat, this was quick and easy. 
Card #1:  I matted a professional wallet photo of my daughter in black cardstock.  I then used Sports Mania to cut the corner soccer ball out of black and its shadow out of white.  (Cut at 1.78x1.71 in.)  I used a black zig marker to write the team name along the top and the year along the bottom.

Card #2:  I cut a traditional 4x6 photo into a small square and matted it on black paper.  I used Sports Mania again to cut the "Kick This" title frame out.  I cut the title frame in blue at 2.13x1.39 in.  I matted the title frame in white and adhered it to the trading card at a slight angle.  The title frame has a layer for the center of the soccer ball which I cut in black.

Card #3:  I trimmed another 4x6 photo to fit the card, being sure to center my daughter to the right of the card.  I cut out I (heart) soccer in blue from Sports Mania at 4.83x1.00 in.  I cut the heart layer out in red (.78x1.00 in.)  I layered all of this to a torn strip of black paper to really make the title pop! 

Card #4:  I turned this card horizontally because I couldn't get the photo trimmed to fit vertically.  I matted the photo to a piece of white paper and then trimmed the mat tight on three sides.  On the last side, right, I left an extra .25 inch and tore the edge.  I used 3-D stickers from K & Company Peter Horjus Soccer Grand Adhesions.  The three soccer balls really make this page pop!


Now that the inside trading cards are done, I have to alter the outside of the box. 


 The first thing I did was wrap 15" of black polka dot ribbon (3/4 in.) around the bottom edge of the box.  I then wrapped 15" of black polka dot ric-rac (1/2 in) around the lid edge.  I used glue dots to hold the ribbon down where the ends meet.  (The ATG adhesive held the rest of it no issue!)

I then added two more K & Company Peter Horjus Soccer Grand Adhesions Stickers.  The large soccer ball sticker is 3-D and came with the small photo frame already attached!  I trimmed an extra photo of my daughter to 1" square and carefully slid it into place.  I then added the "Kickin' It" sticker to the bottom center of the box.  Lastly, I added a small wooden round "M" to the top left side of the soccer ball for my daughter's initial. 


Of course, having two kids, I couldn't stop at one box, so I made a 2nd for my son!
This is another plastic iPod box.  This time I adhered a khaki rounded corner rectangle to the top of the box and put on the #1 stickers.  (Stickers from Pebbles Stickers Snpsht Wrd Stckrs Soccer.)  I used a black zig marker to write my son's name. 

I then put 15" of blue ric-rac with brown polka dots around the bottom edge of the box.

Card 1:  I cut 8 rounded corner trading cards from George and Basic Shapes.  (Same measurements as above.)  I matted a professional wallet size photo of my son on green pattern paper and then wrote the team name and year in zig marker.
Card 2:  I trimmed a 4x6 photo and matted it on white paper. I then used Hot Off the Press Brad Buddies (Soccer!) to put the metal, blue goal net and soccer ball onto another square of white paper. (The soccer ball is actually a brad!)  I then carefully trimmed around the netting and ball to create a white shadow. 

 Card 3:  I matted a different photo on white paper and then used a simple sticker (Score!) from Carolee's Creations Soccer Stickers.  Clean and easy!
Card 4:  I matted a photo with white paper and then used another Brad Buddy from the same package.  The Goal is a metal plate, while the star and dot on the exclamation point are both brads.  I put the brads through the metal plate and then carefully trimmed the brad flaps that you could see.  I didn't want to actually send the brads through the back of the cards so I can journal on the back.

Card 5:  I matted another photo on white, trimmed three sides tight, and left the bottom long.  I tore across the bottom of the mat and wrote "Goalie in Training!"

I hope you enjoyed my projects; I know I did!  Now, on to the blog candy!  First, become a follower and then leave a comment on this project. (Open only to people in the US due to shipping rates!  Sorry!) At the end of the hop I will be announcing my winner. So please check back then!! Now, you are off to
Here's the blog hop order with links for your convenience!


1) wamfamily - Creations with Kathryn – http://wamfamily.blogspot.com/


2) TX Scrapper Mom - TX Scrapper Mom -http://txscrappermom.blogspot.com/

3) TinaB - Tina Time - http://ollieanddextersmommy.blogspot.com/

4) Ms Dee - Dee's Special Things - http://www.deesspecialthings.blogspot.com/

5) Lissa - So Many Crafts, So Little Time http://www.somanycrafts.wordpress.com/

6) CraftyScentiments - Crafty Scentiments –http://www.craftyscentiments.blogspot.com/

7) Scraphappybette - Believe, Dream, Create –http://www.believedreamcreate.blogspot.com/

8) bzymomof9 - Life on the Bright Side – http://quiverofangels.blogspot.com/

9) Jenne - Fairy Craft Mama – http://www.fairycraftmama.blogspot.com/

10) Nicolette Simpson - Beyond Scrapin –http://www.beyondscrapin.blogspot.com/

11) JenMcCalley - Scrappin at McCalley House – http://mccalleyhouse.blogspot.com/      You are here!!!!!!

12) VinDeeLoo - VinDeeLoo's This 'n That – http://vindeeloosthisnthat.blogspot.com/

13) roxybonds - RoxyBonds - Scrappin – http://roxybonds-scrappin.blogspot.com/

14) LisaLisa&ScrapJam - Peanuts & Pepper Paper Crafting – http://peanutsandpepperspapercrafting.com/

15) LeAnnSnyder - LuvToScrap – http://leann619oh.blogspot.com/


Wednesday, January 26, 2011

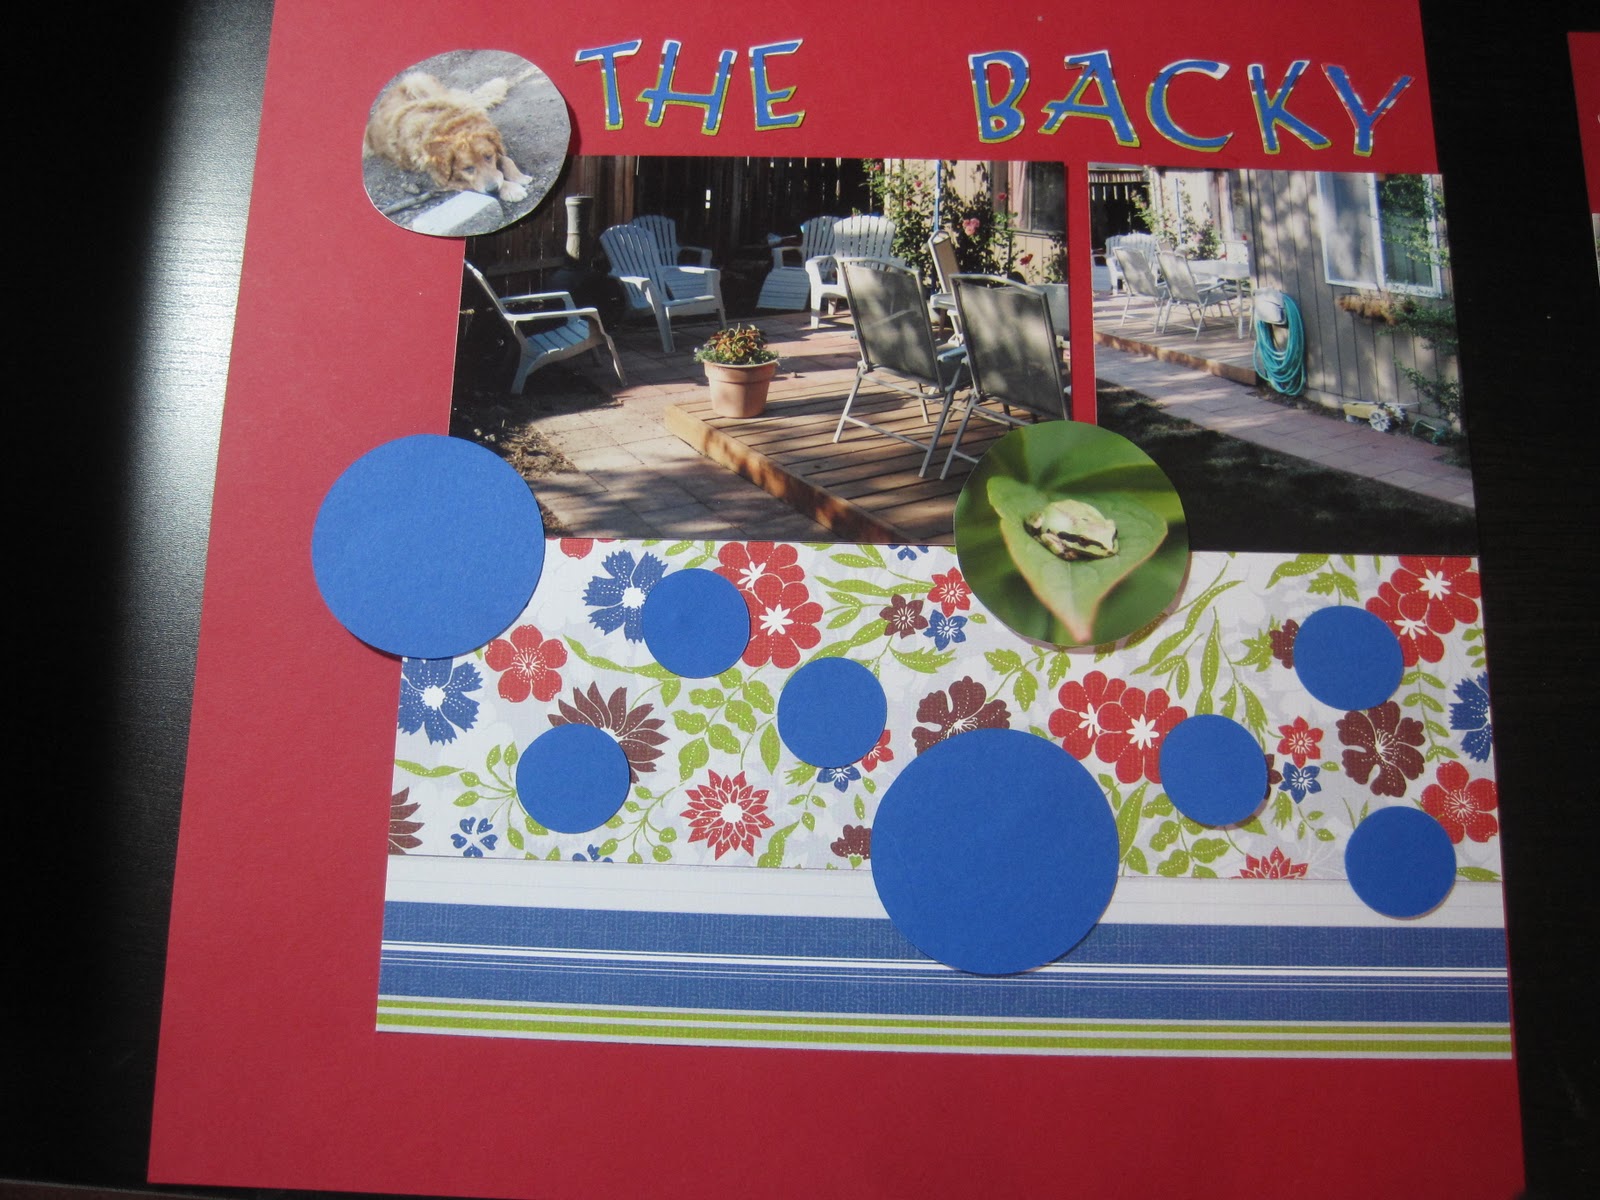
The Backyard Remodel

This is one of the layouts which looks simple, easy and clean, yet took forever!  I learned a lot about the Cricut on this layout which is odd, since the page doesn't include a lot of Cricut accents.  I wanted to steer clear of green backgrounds because I feel the photos would have gotten lost in them. 

I used Medium Berry Red Colormates cardstock for the background and then found two matching patterned papers with the same color red accents. (The patterned paper is from PaperSalon Glad Rags floral and multi-stripe.)


 I added two strips of patterned paper along the bottom of the photos.  My initial plan was to create a scalloped bottom on the striped paper.  So, using my gypsy I created a border and went to cut it.  I learned that cutting on the very edge of the paper made it move around on the mat a lot.  I think it would have worked much better if I hadn't precut my boarders and had the cricut actually cut the boarders in the scalloped shape.  In the end, I just trimmed off the messed up scallops and used a smaller boarder piece. 
After assembling it altogether, I wasn't very happy with the boldness of the patterned paper.  I felt it overwhelmed the photos and took over the page.  Instead of starting over from scratch, I found a bright blue coordinating cardstock and cut two different sizes of circles to create a border on top of the patterned paper.  I think it helped "calm" down the pattern paper.  To tie the blue in, I cut the title (George font) in blue, with the shadow in the striped pattern paper.  In he end, I really like the page, but it was nothing like I originally had planned!

Monday, January 17, 2011

4th Of July LID sketch

This week's LID sketch on the Cricut board featured a double page layout with lots of pictures!  My favorite!  I had some 4th of July pictures to scrap, so I created this layout following the sketch loosely. 
4th of July--10 photos

I used George to make the rectangle title block  and cut it twice.  Once I cut it in bright blue for the background and then I cut it a second time in red with the title "4th of July" cut out.  I used the George font as well.  I then used the Create a Critter set of 3 stars and created a border by copying and flipping the set of three starts back and forth.  (For example, Big star, medium star, little star, little star, medium star, big star).  I then grouped and welded them, and copied the whole thing so I could have a border for both pages.  I used the cut out stars from the border for a little something extra on my title.  I then cut out several other starts from Create a Critter and Gypsy Wanderings. 

I adhered a few more stars, the border and then journaled on the 2nd page.  I decided to hand write my journaling in red ink to continue the American theme.  In all, a simple layout with lots of pictures!

Friday, December 31, 2010

Sauvie's Island July 2008

Sitting here on a freezing cold day (literally it's 34 degrees as a high today in Portland!) I thought I would scrapbook some warm, sunny pictures!  I found a layout design on the Cricut message boards, and loved the circles and graphic nature of it! Plus, what an easy way to get a layout done!  The design was a 1 pager, and I almost always do two page layouts, so I just added the left page with the two circles to compliment the design on the right.  (The right page is nearly what the sketch showed, minus the title!)

Here is the layout as the two page spread.  I used some old patterned paper (maker unknown!) and then  slate blue, navy blue and bright orange cardstock.  I used my gypsy to size the blue circles just a tad smaller than 6x6, so I could cut out 2 on each 12x6 piece of paper. (George Cartridge for the smaller circles.)  I then used the Sports Mania cartridge and cut out the large orange accent circle.  I liked the way it had little lines out of it for adding interest.  This circle is about 7.8" in diameter.  I based all the color choices upon the title "Fun in the Sun" which I had in my stash.  (Embossible Designs by We R Memory Keepers "Fun in the Sun").  I added a few orange paper flowers and then put small glass pebbles in their centers to carry the water theme farther.  I adhered the flowers and glass pebbles with glue dots! 


By the way, we have a new puppy in our house!  Here's a picture of Dexter at 9 weeks old.  He is a black Goldendoodle.  (Yippee, no shedding!)
Dexter--9 wks. old

Sunday, October 17, 2010

I'm in love with my Cricut!

I know, who isn't, right?  But since getting the Cricut Expression, I am loving its versatility!  I actually might be getting more scrapbooking done, but I am also saving money! I make my own cards and now I'm branching out into Halloween decorations!  Below are a few things I've been working on over the last few weeks.

I am a first grade teacher and I teach the intensive reading group at school.  The intensive reading group is comprised of children the furthest behind in reading; because of this, behavior can sometimes become a problem.  They loved it when I called them "Smart Cookies" and I kept referring to this imaginary cookie jar.  Well, one day while teaching I thought of the idea of making a "Smart Cookies" Cookie Jar and then making paper cookies to fill it with.  When the cookies are all in the jar, then the reading group will earn a "cookie party!" 
I love how this turned out!  I didn't have any of the cartridges with a jar, so I used George to make a rounded corner rectangle and then I welded one parenthesis from Gypsy Wanderings (I think).  They come in a set, so I hid the other one and then rotated it to make it look like a lid!  I cut two cookie jars, one in patterned paper with the words Smart Cookies cut out and then one in maroon that is just the outline.  I used George again to make the stripes across the jar and the knob at the top for added decoration.  I pieced it altogether and then decided it would be too flimsy as is, so then I adhered it to a piece of cardboard from an empty cereal box.  Now it doesn't flop and curl and it's a lot sturdier!

Well, you can't have a "Smart Cookie" Cookie Jar without cookies, right?  I used George again and make 1.75 inch (or so) circles.  I used the triangle feature and overlayed the triangles and then rotated them in different directions so it looked like chocolate chips.  I cut these out in cream paper.  I then cut the same circle size out of brown paper and layered it behind.  I though layering a circle was easier than gluing 4 chocolate chips per cookie!  I then cut as many as I could on a 12x12 paper and I ended up with 49 cookies!   I then inked the edges with dark brown to make them look more realistic!  Once again, George was the best investment!


Bosses Day October 16th, 2010
AAAKKK!  Bosses Day falls on a Saturday this year and I totally missed it on Friday.  My Principal is fabulous and he loves a strong cup of coffee.  He even hosts "A Cup of Joe with Joe" parent meetings, so coffee is his thing!  I used Gypsy Wanderings and cut out large coffee mugs and then Sweet Treats font for the phrase "Thanks a Latte Mr. Galati!".  I inked all the edges with chestnut brown for some definition from the white poster board.  Normally I would have decorated his door with this, but he gets to work about the same time I do, so I put it all on 2 pieces of poster board so I can literally slap them up and be done in case he's a little early!

"Too Cute To Spook"
Made by my 7 year old daughter!
We found glittery foam at the Dollar Tree and she just had to think of something to use it for.  She was clicking through scrapbooking/card making blogs that I had left open on my computer and she found one she liked that featured a Penguin, fangs and the phrase "Too Cute to Spook."  She found the cat on Paperdolls Everyday.  We cut it at 4 inches and used the #5 on the blade and max pressure.  We cut it twice and it was still not a clean cut, but we were able to see where to punch the cat out!  She added a hand cut witches hat and a pink nose.  The googly eyes and hand drawn mouth and whiskers truly make it too cute!  She mounted it all on yellow paper and then adhered it to a piece of patterned paper with a Halloween design!


The easiest cards in the world!  (Cricut not even needed, but shhh!  Don't tell anyone!)
I cut double sided Halloween paper to 9 inches long by 4 inches wide.  I folded it in half, and then folded down a 1 inch flap.  I wrapped a piece of ribbon around the flap and adhered it and the flap down.  I used a very thin piece of adhesive to glue the edges of the folded "envelope" on each side.  I then cut a 3.5x4 inch square of patterned paper to slip inside the "envelope" and voila! a quick and adorable Halloween card!

This is what it looks like once the card is removed!

"Dare To Enter"
My son (9 years old) complained that all of our Halloween decorations were not scary enough, so I was digging through the Cricut stuff and found I don't have any Halloween carts.  (I quickly ordered one and am still waiting, but that's another story!)  I used George, once again, and welded two ovals together, overlapping them slightly at the bottom by rotating them.  I cut these out of purple paper and fun foam.  (Much easier to cut than the glittery foam!)  I then welded two circles together for the "whites" of the eyes and cut them in yellow.  Then I took a black marker and colored in the pupils and then used stickles over the top to make them sparkly.  I love how they look!  I cut the Dare to Enter out as well and hung the whole thing on our front door.  Not knock down scary, but I love it!