CLICK HERE FOR FREE BLOGGER TEMPLATES, LINK BUTTONS AND MORE! »
Showing posts with label Thankful Thursday Design Team. Show all posts

Thursday, August 18, 2011

Thankful Thursday Design Team Post--A Little Note

Here in Oregon, summer really begins about the Fourth of July and proceeds through the middle of September, if we're lucky.  This year, although we've been dry, (thank goodness--I was beginning to mildew!) we haven't been very warm.  We haven't broken 90 degrees yet this year, and that is rare.  Why all this concern about summer and weather?  Well, I'm a teacher and I head back to work in the next couple of weeks.  To "celebrate" the end of summer and the beginning of fall, my family decided to host an "End of Summer" party.  Here is a sample of the notecard invitations I made:
Sorry for the horrible picture!  My email is down...gasp***!  The only way I could get a photo was to take it on my iPhone and then upload it to Facebook, and then download it to my computer.  A long, pixel destroying process!  Sorry!

I bought a set of note cards at Target several months ago and I love them!  They are approximately 4x5" and have matching envelopes.  I use them for everything!  I used an orange-yellow note card as the background and then used two coordinating pattern papers to create the larger scalloped border and then the thin rectangle.  I was going to have a video on how to create a scalloped border with the Gypsy, but dang email!  Is that something you would be interested in knowing how to do????  Let me know in the comments if you would like me to post it!

I then used Life's a Beach and cut out the little flip flops in a solid orange cardstock.  I used my Crop-a-Dile and punched three tiny holes to thread my fibers through.  So, picture the toe hole (toward the top) and two side holes.  First, I took my fibers and folded them in half and threaded the folded part from the top down into the top hole.  As soon as a tiny bit was showing I pulled a little bit through and left it.  I then used the open ends to thread through each side hole.  I didn't knot it or anything, rather I used my ATG gun to run adhesive over the fibers while I applied it to the note card.  These were pretty easy to make, although threading 60 flip flops took some time.  I think they are cute enough to be worth it!

On the back of the note card I added a little poem and the details for the party.  Here's the poem I used.  (I did not make this up, rather I combined two poems I found online!)  

The end of summer is almost here
so let's get together for some cheer.
We'll have food and fun for all,
so come on and celebrate again before fall.


Thanks for looking and I love comments!
We have an awesome prize this month, it's a Post-it prize pack!! Don't forget to head over to Crazy About Cricut at http://crazyaboutcricut.blogspot.com  and enter your family's project!

Thursday, August 4, 2011

Thankful Thursday Design Team Post--Bookmark


My kids LOVE to read, so making a bookmark should be something I do all the time, but I haven't!  I was stuck for a while for ideas but then I remembered that my son applied for a position to the Green Team at his school and he got it!  I was so proud of him!  The Green Team is a team of students that helps keep the school green and eco-friendly.  I decided he needed a "green" bookmark!  Besides encouraging people to be green, I used only scraps from my scrap bin, so the bookmark is physically green too by using scraps! 
The bookmark was pretty simple!  I cut a rounded corner rectangle from George and Basic Shapes (LOVE THAT CART!).  I then used Give a Hoot to cut out the "Go Green" phrase and the frog!  

Here's a close up of the frog!  I cut all the layers, including the shadow!  I think he's really cute!  My son picked all the colors and the frog and phrase!  Don't you think he did a great job? He wanted googly eyes too, so we plopped them on as well and it sure adds some personality! Lastly, I added a few fibers to the top to make sure the bookmark stays in place!

Thanks for looking and I love comments!
We have an awesome prize this month, it's a Post-it prize pack!! Don't forget to head over to Crazy About Cricut at http://crazyaboutcricut.blogspot.com  and enter your family's project!

Thursday, July 21, 2011

Thankful Thursday Design Team Post--Movies!


Movie theme???  Hmmm...I had a great idea for this project a couple of weeks ago and then it left me.  I thought, and thought, and thought...and then remembered the photos of my daughter taking part in a Dr. Seuss musical at school!  Ah-ha!  Inspiration struck! 
Here is the current project for the Design Team and love how this layout turned out! 
"Seussical the Musical"
March 2011
My daughter's class worked with their fabulous music teacher and these 2nd graders put on a great musical based on all of Dr. Seuss's books.  It was hysterical!  The songs were about his books and each child had a set of tongue-twister lines that helped the story line flow.  It was fabulous to watch the kids perform!


This layout really evolved and took two days for me to get "flushed" out.  This isn't my normal style as I normally just get it done...I even fell asleep last night thinking about how the layout should look.  The great news, I LOVE THIS LAYOUT!  :)  I cut one piece of Color Mates (light autumn red) cardstock  into four, three inch pieces.  I inked the edges with black ink for added definition.  I then cut "Suessical the Musical" from Opposites Attract.  I used scrap papers for all the other cuts, so I have no idea manufacturers!  (Love using up my scraps!)  I then cut out fish (Red Fish, Blue Fish) from An Ocean of Words.  I used a black pen to add stitching detail and fins to the fish.  A couple of googly eyes completed the look!
Then I added two green eggs (Green Eggs and Ham) from Smiley Cards and inked their edges as well.  I used the Peachy Keen stamp set and black ink to stamp the cute faces.  I used foam tape to pop one up a little bit for some dimension.

My favorite embellishment is this Cat in the Hat with his stack of books.  Do you remember him balancing everything????  Well, I thought it would be cute to balance a stack of books and then a photo on top!  I LOVE how this turned out.  I cut the books from Locker Talk and cut the shadow (black) and then the books twice (once in green and once in blue).  I had to hand piece the blue books on top of the green, but it was worth it!  I even added more foam tape for added dimension.  I then cut the "pages" out of textured white cardstock.  I thought it might look more like a stack of pages this way.  I then found a clip art image of The Cat in the Hat online (a coloring page!) and fussy cut him out.  I trimmed off the rest of the page as all I wanted was him and his hand to hold the stack of books.  I colored him with colored pencils and then popped him up with foam tape as well.  I even tucked part of his glove behind and then in front of the books to look like he is really holding them!  Lastly, I drew wavy lines to write my journaling on; once the journaling was dry, I carefully erased the pencil marks.

Thanks for looking and I love comments!
We have an awesome prize this month, it's a Post-it prize pack!! Don't forget to head over to Crazy About Cricut at http://crazyaboutcricut.blogspot.com  and enter your family's project!


Thursday, June 30, 2011

All American Blog Hop! (With Blog Candy!!!!!)


Hi Everybody!
If you just came from the very creative Paula's blog @ http://www.owlbescrappin.com then you are in the right spot!   If you just stumbled into this Blog Hop, then by all means join us!  This is a great hop featuring All American Crafts. Please head over to see Jenny at http://www.crazyaboutcricut.blogspot.com to start from the very beginning.  Be sure to read to the very end to have 2 chances at blog candy!


Thank you for joining us for the All American Blog hop!  We are sharing projects that celebrate anything American!  So anything like BBQ's, family picnics, 4th of July, or more.  I created a 4th of July layout using pictures from 2009.  (Yes, I'm still behind in my scrapping!) 


Sorry for the bad picture!  It's raining outside and unless I wanted the flash reflection, this is the best I could get today!  I made a two page 12x12 layout for the Fourth of July.  I based it all on textured cream cardstock and used a deep red to mat all the photos.
Here are photos of each page separately.
Left page...

Right page...

I then used EK Success Fresh Cuts FC014 Free & Brave.  This is a page of cardstock accents that you hand cut out (yuck!)  and then can use.  I love that they are pre-done, but sometimes I feel like spicing them up.  That's what I did today.  Although the cardstock accents are 2-d, they have buttons, brads and fibers printed on them.  Today I added whatever accent they had printed myself, creating 3-d embellishments.  This is a combination of three accents that I set together to make the title.  I popped the title up with foam tape and adhered buttons with fibers to everywhere that they were printed.  Using glue dots helped make the buttons stick!

Another accents featured cute white stars.  Luckily I had these brads in my stash and they looked great, so I added them to the hat!

Another accent were these cute photo corners (all 2-d) with printed fiber knots on each one.  I tied my own little red fiber knows and stuck them over the printed ones.  This is the only photo I didn't mat, but with the photo corners, it stands out on its own.

This heart accent was cute, but with a little spicing up, it is adorable!  I added the white button over the printed white button and then hand sewed the red fibers where it was printed.  This was a pain because I couldn't find my needle so I had to hand sew the heart and all the little ties in the buttons.  What one will do for creativity, right?

This is one of my favorite accents.  It was a 2-d flag with buttons printed where the stars should be.  I layered blue buttons with khaki fiber knots over the top. I actually threaded three buttons per fiber and made a string of them so it would be flatter.  (I tied a knot, then threaded one button, then a second and then a third and then tied the last knot.  This made little rows of three buttons!)

Blog candy chance #1 Scrapping at the McCalley House:

There are several ways to get an entry!
1.  Comment on today's post = 1 entry
2.  Become a follower (or already are one) = 1 entry
3.  Mention my blog on your blog (give me the address of yours to see!) = 1 entry!
**Just be sure to leave your contact information for me!**

I will use the Random Number Generator on Sunday, July 11th to find a winner!  Winners must be within the US and respond to my email within 5 days to claim the prize.

Blog candy chance #2 From CrazyaboutCricut 
There are a couple of GREAT prizes to win today!  You can win a Scrap 'n Tote!!  You can also enter to win this AWESOME prize pack from Post-it! There is also the BBQ set of stamps from Peachy Keen!

To enter to win the prizes:
1. You must leave a comment on all of the blogs in the hop.
2. Please be a follower of Crazy About Cricut.
That's it!  Winners will be announced July 7th!  

Thank you, now please head over to see Sandra's amazing project at Sandra @ http://www.sweetpeascards.blogspot.com/

Here is the lineup in case you get lost or need to stop along the way:
Heather @

Tuesday, June 28, 2011

Coming Soon: All American Blog Hop! (With Blog Candy!!!!!)


Be sure to stop by Thursday to check out this great All-American blog hop featuring all type of scrapping crafts!  There are many talented ladies who have great projects ready to show!

Thursday, June 2, 2011

Thankful Thursday Design Team Post--Oh Boy!

Oh Boy!  It's Thankful Thursday!
Here is the current project for the Design Team and I really like the patterns I used, even though I deviated from my typical style!  The challenge this week was to create something with a man/boy.    I have been feeling like I have been "neglecting" my scrapbooking because I have gotten into more home decor and cards lately, and I really love my layouts.  I decided today was a day to return to the the layout!  I am a chronological scrapbooker, and I don't like to go too far past the current set of pictures because I am always certain I will miss out and forget a great set of photos.  So, I picked up my next envelope of photos and realized it was Christmas....What is a Design Team Member to do?
Be creative!

Do you remember the days when Christmas morning seemed to never come?  Do you remember walking (sprinting) up to the tree to see your presents all wrapped and wondering who had that huge box in the corner?  The photos I scrapped today reminded me of the excitement kids have for this special morning!  The "OH BOY!" look is apparent on each of my children's faces in this bright layout.  

OH BOY!  
This was a great layout to do, even though it's just one page!  (I have even more Christmas morning photos, but those will be saved for another day, another layout!)  I used 3 sheets of paper:  1 solid green cardstock (background), 1 checkered white and black (top and bottom stripe) and a snowman patterned paper (Kangaroo and Joey brand).  I folded over the top left and bottom right corner of the checkered paper for some contrast and then used a set of Creative Imaginations  (Studio Basics 101--Jolly Elements) cardstock stickers.  (See the penguin, the green file tab, the red and green stripes and the green washer?  Those are all stickers!)

I cut the title using Sweet Treats at about 2 inches tall.  I wanted to continue the black and white theme but it needed a little something, so I added a piece of red and white polka dot ribbon.  (TRICK:  I don't like the bulk of knots sometimes so I simple thread the ribbon around the letter, then carefully twist UNDER the letter so that the top of the ribbon shows on both sides.  I then use my ATG gun to stick down the ribbon and I have a cute accent without the bulk of a knot!)

I needed a little accent block, so I matted a penguin onto red paper and then matted that in white.  I slipped a sticker (green) file folder tab to the edge and used the ribbon in the same way! 

Thanks for looking and I love comments!
We have an awesome prize this month, it's a Post-it prize pack!! Don't forget to head over to Crazy About Cricut at http://crazyaboutcricut.blogspot.com%20and/  and enter your family project!


Tuesday, May 3, 2011

Thankful Thursday Design Team--Mother's Day Project

Welcome to Thankful Thursday! This is my first project for the Design Team, so I am ultra excited!  The challenge this week was to create a project for Mother's Day!  Here is the project that I made with my two kids. 
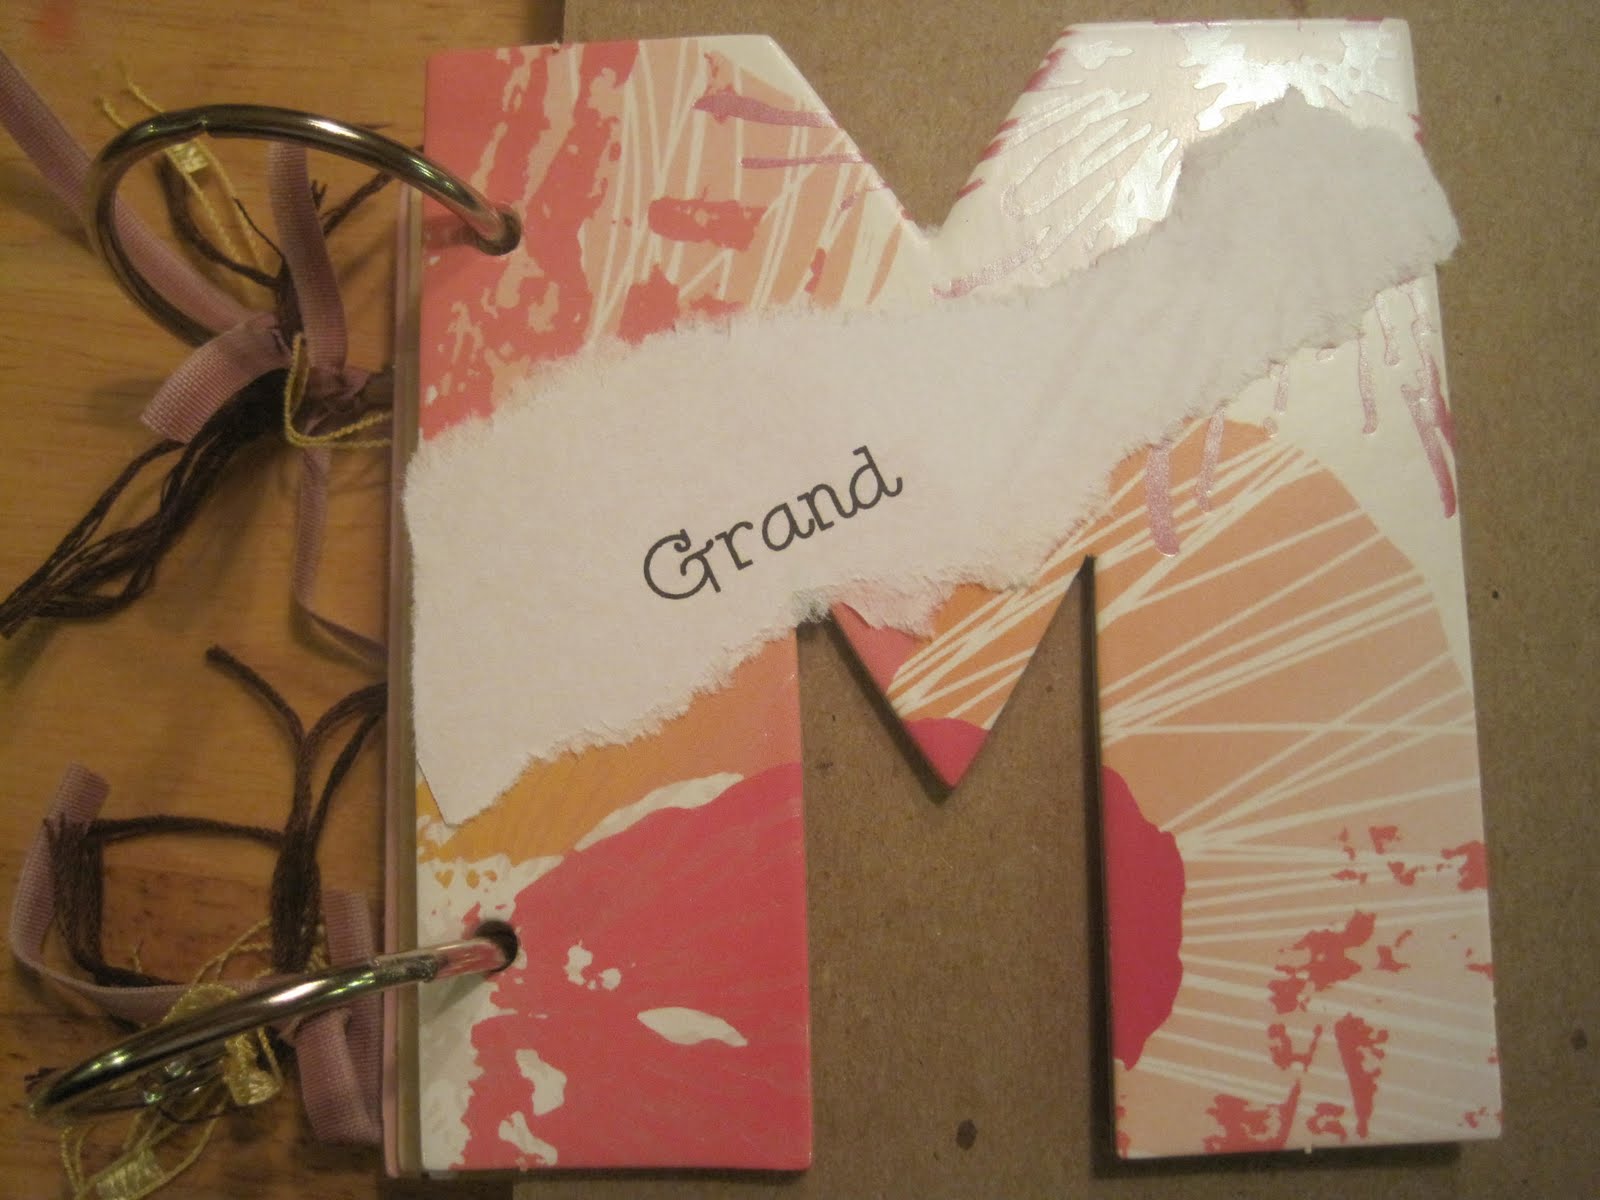
I bought this SEI "Mother" shape book at the CK Convention a couple of years ago, planning, of course, to do a wonderful Mother's Day project!  Well, this was the year!  The book came pre-covered in the papers you see, so all I had to do was stick the O-rings on and then add embellishments, photos and journaling!

Here's the "cover" which is the letter M.  I added fibers in matching colors to the o-rings for some added flair.  I then typed out "Grand" on the computer and then tore it to fit diagonally on the M, since this book is for the "Grandmothers!"

I added torn paper sentiments through out the book, this "I love you" is on the back of the front cover.  I asked my kids questions about each grandma and put their answers in the correct book.  (I made two identical books, one for each grandma, but with different answers from my kids!)

Some pages the photos are diagonal, because I couldn't trim them small enough.  My daughter was instant that her entire body be in this photo, so the photo is rotated! :)

Here is a page (page T) with a photo and the torn paper answer.  It says "My favorite food at Grandma's house is her blueberry waffles. ~Maddie"  Each child answered the same question, so you can compare the answers!

 Here's the "H" page and my son's quote says "I love geocaching with my grandma."  By tearing the paper, it was quick and easy to make it fit!
Since I made two books, one for each grandma, I included one picture different in each book.  My mom received a picture of me with my daughter, while my mother-in-law received a book with a photo of my husband and my son. 

Example of quotes in the book.

Too cute, right?  The kids loved picking the pictures and answering the questions!  They were able to do most of the project with me and it went really quick!

We have an awesome prize this month, it's a Post-it prize pack!! Don't forget to head over to Crazy About Cricut http://crazyaboutcricut.blogspot.com%20and/  and enter your family project!