CLICK HERE FOR FREE BLOGGER TEMPLATES, LINK BUTTONS AND MORE! »
Showing posts with label Keller's Creations. Show all posts

Wednesday, August 10, 2011

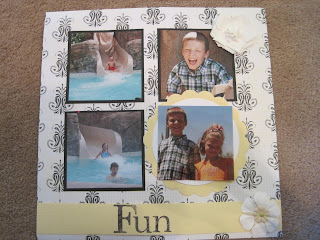
Tucson Fun

"Tucson Fun" May 2009
This double page layout was purchased from Keller's Creations!  I never use black and white and thought that this layout was visually stunning!  The light yellow accents are perfect!

Left Page
Three out of four pictures are matted in black, with the remaining photo emphasized by a yellow flower and white circle layered beneath it.  There is a light yellow 1.5 inch strip horizontally across both pages.  I used a set of stamps and black ink to stamp "Tucson Fun" along the bottom border.

Right Page
Notice the flower emphasized photo is in the opposite corner to balance the weight of the page!  I added a few white floral embellishments and added one small yellow flower center and brad to the far right, bottom flower!

Tuesday, July 19, 2011

Science Fair Layout

"Science Fair"
3/09
Here's the final layout from the Keller's Creations class at the CK convention.  I love the circles, especially those that are scalloped!  Did you see the large half circle on the left hand side?  Isn't it cute?

Here's a picture with the half circle lifted up!  There is a row of mini tags underneath that can showcase even more photos!  Be sure to check out Keller's Creations webpage at http://www.acidfree.com/index.cfm?lid=1.  I am not a sponsor, nor am I paid for any advertising!  I just like her papers and her layouts!

Monday, July 18, 2011

Christmas Concert

"Christmas Concert"
December 2008
Here's another quick layout that I made at the CK Convention in the Keller's Creations class.  I love the circles and the film stripe effect along the bottom!

One thing Keller's creations is known for is her license plate papers.  Here is one that has been cut to be divided over the 2 pages, but it's really cute.  I added some ribbon in the slits.  (See a past post about a wall hanging using the mini-license plates to see another idea with them!)

Sunday, July 17, 2011

"Turning 8"
April 2009
This is another layout I completed at a class at the CK Convention in Portland, this time, I took the Keller's Creations class.  I really like her bright colors and thicker papers.  Her website is:  http://www.acidfree.com/index.cfm?lid=1  I thought the bright papers and circles really lent itself to a birthday layout! 
I added the letter stickers to spell words (like Lego's, fun, bike) to capture the birthday, but everything else came in the class!

I really like the rhombus in the middle with the folded back triangles!  Doesn't it make a cute frame?  Enjoy!

Wednesday, May 4, 2011

Little Boy Wall Hanging

While attending the CK Convention in Portland this year, I fell in love with Keller's Creations mini license plates. I have used the full sized ones for a wall hanging in our house, but as soon as I was the mini's I knew I needed a new project! I bought six of them and decided to use them to create a wall hanging for my nephew Landon's room.


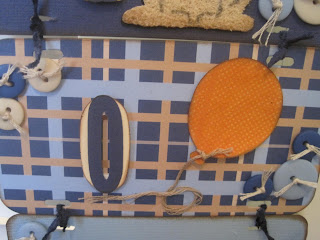
I also puchased a package of cute blue and khaki patterned paper and matching buttons at Keller's Creations as well.  I used those as the jumping off point for the solid papers that came from my stash.  It was perfect because Landon's room is a nice shade of light blue!

I cut Landon's name out using Jubilee, creating a shadow and the overlay.  I inked the edges to make sure that it showed on similar colored paper.  Landon's room is decorated in robots, but I don't have a robot cartridge!  I used George (my favorite cart!) to create this cute robot.  I then slightly expanded the size of it to create a black shadow. I was inking the edges of the robot when I dropped my ink pad on the grey robot!  It was awful.  Luckily, I was able to ink over the entire robot to give it a "rusty look."  That was a quick save!  I added a few Keller's buttons with cream fiber tied through.   (Hint:  I used glue dots for the buttons and googly eyes so they wouldn't fall off!)  I inked the edges of everything in brown ink for a cohesive look!

I attached each license plate together with a blue shaded fibers.  I cut the duck from Create a Critter!  (My brother and I are HUGE Oregon Duck fans!)  A couple more googly eyes for character!  Each mini license plate has a few buttons on it to add continuity.

What little boy doesn't like milk?  I used this from Locker Talk and cut the first layer (the milk and carton) in white craft foam!!!  It made the milk look like it had real dimension.  I then popped up the center part of the red milk carton with pop dots and inked the edges of everything.  I used a White Milky Pen to write "Milk."

The dog is cut from the last few remnants of my brown fuzzy paper.  (I think it's from Every Day Paper Dolls.)  I used a brown pen to add the accents and then layered on a cute pink nose and googly eyes.  I inked the edges again!

The balloon was a simple cut, but I cut off the string that was attached and tied on a real cream fiber.  I then flocked the patterned orange paper with orange flock to add a little interest.

Lastly, I added a car from Every Day Paper Dolls.  I used black brads for the tires and added a details with black paper (pop dots behind the windows!) and a black pen for details.  Lastly, I added a cute fabric tag with a curly q on it to mimic the "exhaust."

Hope you enjoy!